Using the Wix app for Pricing Plans
Pricing Plans: Customizing Your Plans on the Wix Mobile Apps
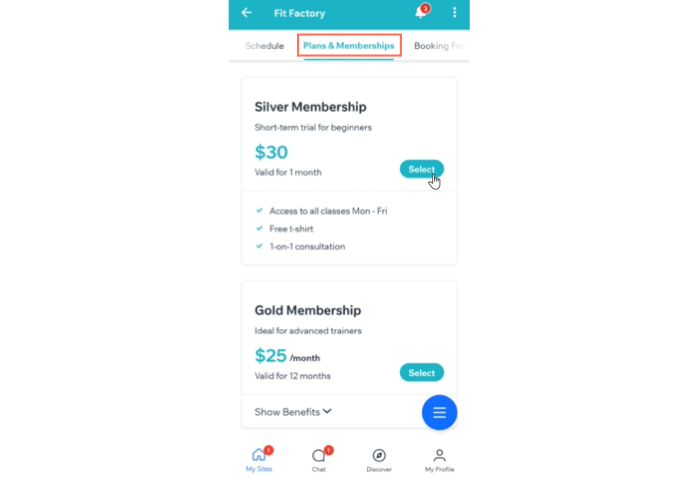
From the Wix app, you can add and customize your pricing plans and how they appear to members on your Wix mobile apps (e.g., Spaces by Wix, Fit by Wix) or your own native app.
Start by adding an element to your mobile app's homepage to feature your plans. You can include pricing and benefits for up to 5 plans. If your plans are already set up, you can customize the Pricing Plans screen and how it appears in your app.
Tip:
Learn how to create pricing plans in the Wix app.

Adding the Pricing Plans element to your app's homepage
Add the Pricing Plans element to your app’s homepage to feature your plans to members. You can customize how your plans appear.
To add a Pricing Plans element:
Go to your site in the Wix app.
Tap Manage
 at the bottom.
Tap Mobile App.
(If needed) Switch to editing a different mobile app:Tap the mobile app name at the top.
Tap the relevant mobile app.
Tip: If you want to edit a different mobile app (e.g. Fix by Wix), choose the app as your preferred mobile app.
Tap Edit.
Tap + Add Element.
Select Pricing Plans from the options at the top.
Select one of the element templates:Carousel: Shows one plan at a time, allowing you to provide more detailed information. Members swipe to view additional plans.
Pricing plans: Shows all plans in a list format with fewer benefits displayed. Members need to expand each plan to view its benefits.
Member Subscriptions: Displays the different memberships and packages your members have.
Customize the element:Plan Display: Tap Edit and select up to 5 plans to display.
Display benefits list: Enable the toggle to show the benefits of each plan.
Note: These options are available for the carousel template.
Sorting: Choose the order of plans to display (e.g. newest to oldest, custom).
Note: This option is available for the Pricing plan template.
Element title: Enable the toggle to give the element a name and display it.
Margins: Set the top and bottom margins for the element.
General settings:Visibility: Choose which devices you want to show this element on (Android, iOS, or All).
Location: Select a screen where you want this element to appear.
Tap Add at the top.
Tap Done.
Customizing the Pricing Plans screen on your app
Once you've set up your plans, a dedicated Pricing Plans screen is added to your app. You can customize how it looks or hide the tab if you only want to feature your plans on your app's homepage.
To customize the Pricing Plans screen:
Go to your site in the Wix app.
Tap Manage
 at the bottom.
Tap Mobile App.
(If needed) Switch to editing a different mobile app:Tap the mobile app name at the top.
Tap the relevant mobile app.
Tip: If you want to edit a different mobile app (e.g. Fix by Wix), choose the app as your preferred mobile app.
Tap Edit.
Tap the Screen drop-down at the top and choose Pricing Plans.
Tap the Pricing Plans element and select Customize element.
Customize your element:Sorting: Choose the order of plans to display (e.g. newest to oldest, custom).
Element title: Enable the toggle to give the element a name and display it.
Margins: Set the top and bottom margins for the element.
General settings:Visibility: Choose which devices you want to show this element on (Android, iOS, or All).
Location: Select a screen where you want this element to appear.
Tap Save.
Tip:
To update the name of the screen or reorder your navigation screens, tap on Screens at the bottom right of the Wix app.
