Using the Wix app to manage your bookings
Wix Bookings: Managing Bookings in the Wix App
Manage your bookings on the go, directly from your phone on the Wix app. You can schedule new sessions, reschedule existing ones or block off time to prevent clients from booking when you're not available. Filter your calendar to make it easier to find sessions by staff members, locations or services.
In this article, learn more about:
Get the Wix app:
Engage with visitors and manage your business directly from your phone. Search for the Wix app in the App Store or Google Play, or use these links to download right to your phone:
Checking your upcoming sessions in the booking calendar
Access your booking calendar from the Wix app, to view and organize your sessions on the go. There are different views to choose from, depending on your personal preference. You can also filter each view to quickly find and manage sessions on the go.
Tap on any booking to see the details, including the participant list, time and date.

To check your upcoming sessions in the booking calendar:
Go to your site in the Wix app.
Tap Manage
 at the bottom.
Tap Booking Calendar.
Tap Calendar.
Tap the View icon
 at the top right.
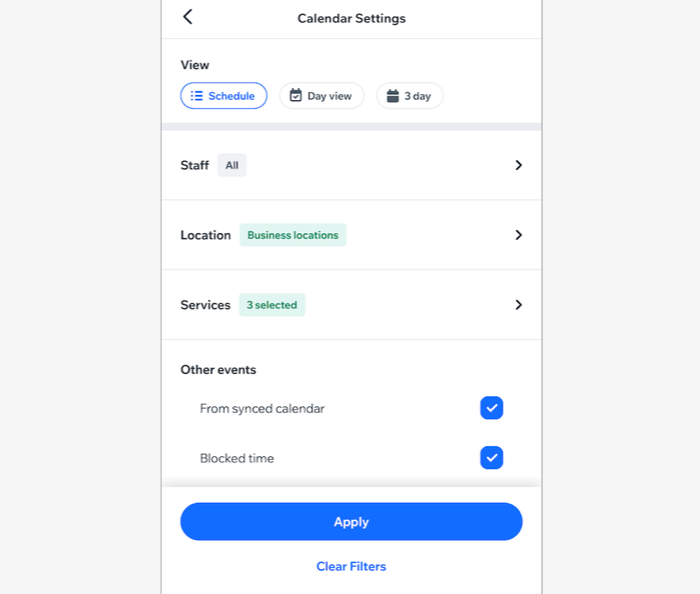
Choose how you want your calendar to appear using the calendar view and advanced filters:
Calendar view
Tap the calendar view you want to see:
Schedule: See all upcoming sessions in order, regardless of the time in between them (e.g. sessions on Friday and Monday will appear next to each other if your business is closed on weekends). This is a convenient way to book clients in for their next session.
Day view: See all upcoming sessions for a specific day, including empty time slots. This is useful for scheduling clients or creating new services.
3 day: View sessions over a 3-day period. This is great for scheduling new bookings, especially during busy periods.
Advanced filters
Tap to choose which filter you want to add to your calendar:
Staff: Tap the checkbox next to the relevant staff member(s) you want to display. Then tap Select.
Location: Select an option: All locations, Business locations, Custom location, or Client's place. Then tap Select.
Note: If you have multiple Business locations, tap the checkbox next to the relevant location(s).Services: Tap the category you want to add (if relevant). Then, tap the checkbox next to each service you want to filter and tap Select.
Tip: You can tap the All checkbox to add an entire category. Then tap Select.Other events: Tap which other events you want to show: From synced calendar or Blocked time.
7. Tap Apply.
Tip:
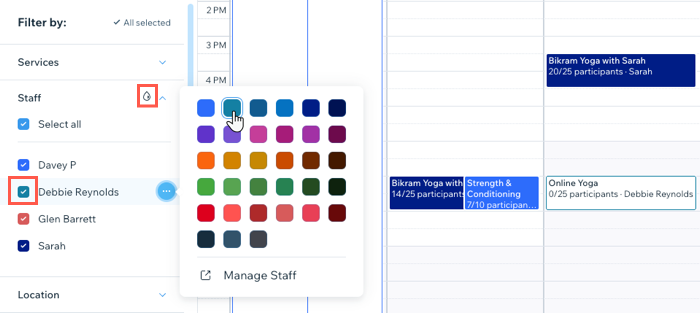
The color coding you apply to sessions in your booking calendar on desktop also appears in the Wix app.

Scheduling new sessions in the booking calendar
Use the booking calendar on the app to schedule new appointments or classes. While courses can only be added from your desktop, you can add more people to existing courses and classes through the app.
To schedule sessions in the booking calendar:
Go to your site in the Wix app.
Tap Manage
 at the bottom.
Tap Booking Calendar.
Tap Calendar.
Choose what you want to do next:
Add a new appointment to the calendar
Tap the Add icon
 and select Appointment.
Choose an existing client or tap + Add New Contact to add a new one.
Select the relevant appointment.
(Optional) Tap Change next to your client's name to select a different client.
Select the date of the appointment from the drop-down.
(Optional) Choose if you want to create a recurring appointment:Select how frequently the recurring appointments take place from the Repeats drop-down.
Select the number of times the appointments repeat from the For drop-down. Then tap Select.
Tap the Location drop-down to choose where the appointment takes place.
(Optional) Tap Change next to the appointment name to select a different service.
Add the session start time, duration, staff member, and any relevant resources.
Note: If there are scheduling conflicts, a notification will appear. You can continue scheduling or tap Show free time slots to adjust the timing.Tap the Payment options drop-down to select how your client will pay for the session:Use client's plan now: Redeem the session from the client's membership plan or package as soon as you schedule it.
Use client's plan later: Redeem this session from the client's membership plan or package at a later date (from the Manage Participants section of the booking calendar, or the Orders tab).
Note: If your client doesn't have a pricing plan yet, you can tap Sell Plan to choose a plan for them, before continuing to create the appointment. Make sure you get the client's consent before signing them up for one of your pricing plans.
Collect payment: Charge the client for this session now.
(Optional) Tap Add Another Service for multi-service appointments. Then repeat steps 5-10 to add a new service.
(Optional) Tap the Notify client with an email checkbox to send your client an email with the details.
Tap Book.
Note: For repeating sessions, tap Continue to review your sessions then tap Book.If you choose to collect payment, select a payment method.
Add a new class to the calendar
Tap the Add icon
 and select Class.
Add the service details:Service: Select the service you want to schedule.
Staff Member: Select the staff member giving the class.
Service Location: If you offer the service in more than one location, select the location of the class.
Start Date: Edit the date.
Start Time: Edit the start time of the class.
Duration: Select the duration of the class.
Repeat: Tap to select how often the class takes place.Select the relevant option from the drop-down: Weekly, Every 2, 3 or 4 weeks.
Select the day(s) of the week the class takes place.
(Optional) Click Set an end date and choose the date of the last class.
Tap Add Session(s).
Add participants to an existing session
Tap the relevant session in your calendar.
Tap Manage Participants.
On the Booked tab click the Add icon
 at the top right.
Choose a participant from your contact list, or tap + Add New Contact to fill out a new client's details.
(Optional) Make it a group booking by adjusting the number next to Group Of.
(Optional) Select the Notify participant with email checkbox to send your client an email with the details.
(Optional) Select the Mark as checked in checkbox to mark your client as checked in for the session.
Tap Add Participant.
Tip: Tap the Waitlist tab to view those specific participants (make sure to enable waitlists in your booking policy to access this tab).
Updating and rescheduling sessions
In the Wix app, you can update appointments, single sessions or all future sessions. You can also change staff members, locations or add any notes for yourself.
To update or reschedule sessions:
Go to your site in the Wix app.
Tap Manage
 at the bottom.
Tap Booking Calendar.
Tap Calendar.
Tap to select the relevant date.
Tap the More Actions icon
 next to the relevant session.
Depending on the booking type, follow the steps below:
Appointments
Tap Edit.
Make the relevant changes, including:Date: Select a new date for the appointment.
Location: Choose a new appointment location.
Session starts & Duration: Edit when the session takes place and how long it lasts.
Staff: Assign a different staff member.
Note: If a staff member is not available or there is a conflict in scheduling, you'll see a notification.
Show free time slots: View other available time slots of the staff member and select a new time.
Add note to self: Add a personal note about the appointment.
Notify client with an email: Check the box to update clients about any changes.
Tap Save.
Classes or Courses
Tap Edit Session.
Make the necessary changes, including:Staff: Assign a different staff member.
Max. Number of Participants: Edit how many people can join the session.
(For classes only) Location: Change where the session takes place.
Time & Duration: Edit when the session takes place and how long it lasts.
Additional Information: Add a note to yourself about the session.
Tap Save.
(Optional) Tap Yes to send your client an email with the updated details.
Blocking off time using the Wix App
If you or a staff member are going to be unavailable, block the time off your calendar to prevent clients from booking your services.
To block off time using the Wix app:
Go to your site in the Wix app.
Tap Manage
 at the bottom.
Tap Booking Calendar.
Tap Calendar.
Tap the Add icon
 .
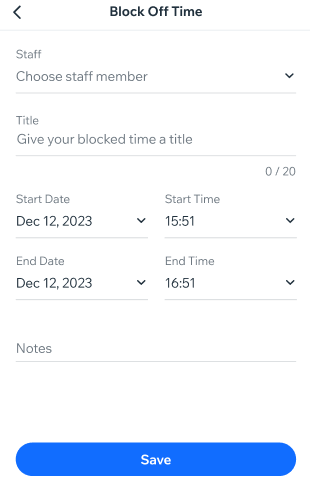
.Tap Blocked time.
Tap to select the relevant staff member from the drop-down.
Tap to enter a Title for the blocked time.
Select a start date and time.
Select an end date and time.
(Optional) Tap Notes to add more information about why the staff member's time is blocked (this note is not visible to clients).
Tap Save.

Did you know?
Clients can use one of the Wix mobile apps to book your services. Just invite them to download the app and become members of your site. Once they are members, they can easily view and book services and then keep track of upcoming bookings in the app.
