Wix Functions
Wix Functions: Creating a Function
Important:
We are currently rolling out Wix Functions. It is not yet available to all users.
Wix Functions lets you add custom logic to Wix apps like Wix Stores, Wix Restaurants, and Wix Loyalty Program to better suit your business needs.
The Functions builder is a no-code interface where you create custom outcomes for various business scenarios using conditions, formulas, and dynamic values. The builder visually represents your logic, helping you understand how different criteria affect the function's output. You can start from scratch or customize a template designed for a specific Wix app.
How does it work?
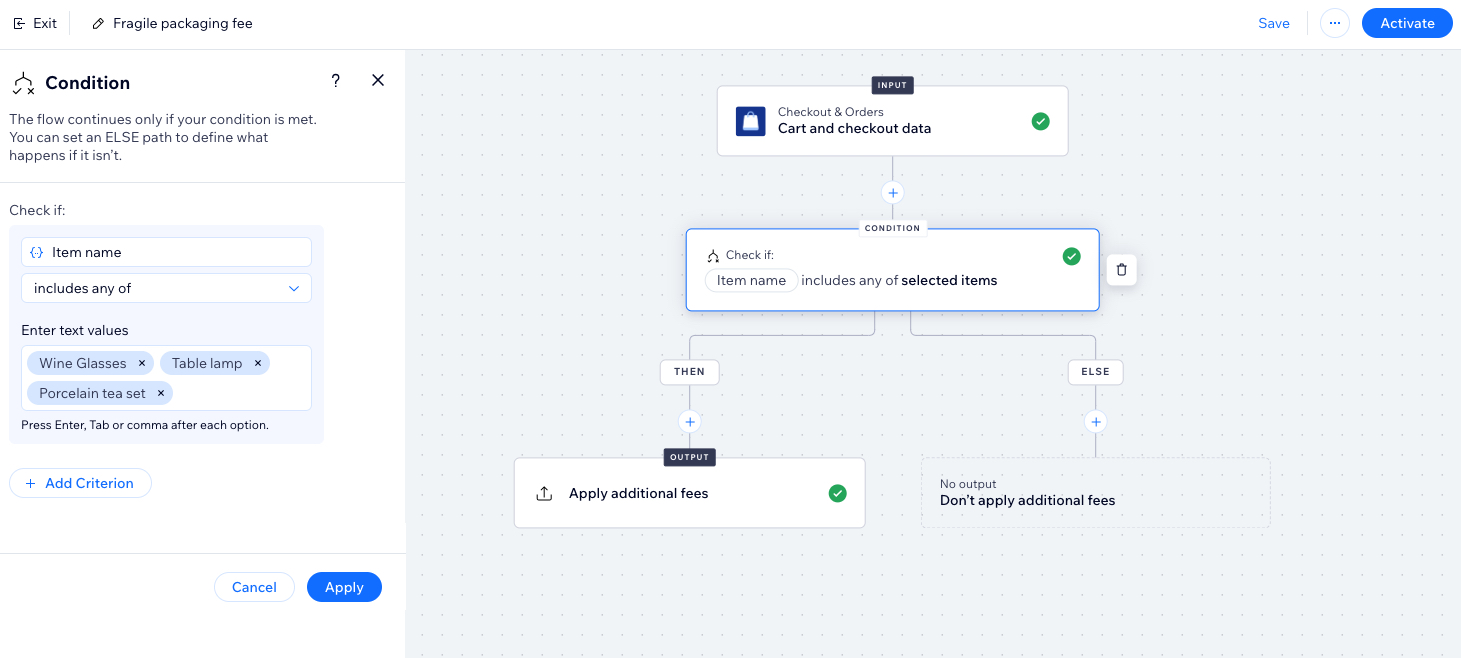
The function begins with read-only Input data from an app, such as Wix Stores cart and checkout data. In the function builder, you can set up a Condition by using 'if/else' logic (e.g., if product name is X, add additional fees; if the product name is Y, don't add fees). The condition determines the Output, or the result you want (e.g., the specific fee applied if the condition is met).

Creating a function
Choose a function type from the Function catalog to start. The function types include:
Additional fees: Charge extra fees based on a customer's cart and checkout details. For example, charge an extra handling fee for fragile products.
Checkout validations: Set requirements that must be met before a customer completes checkout. For example, require a minimum order value or limit the number of items purchased.
Loyalty rewards: Offer better loyalty points-to-discount conversion rates to customers who meet certain criteria, like placing 2 orders within 30 days.
To create a function:
Go to Functions in your site's dashboard.
In the Function catalog, click Create Function under a function type.
Tip: Click More info to learn more about a function type.Choose how to create your function:Use a function template: Click Use Template next to a template.
Create your own function: Click Start from Scratch at the bottom left to build your own.
Start building your function in the function builder. Each function has unique input data as well as an output that should be defined. You can also alter the function's condition and add more steps to the flow. Learn more about the function components in the FAQ section of this article.If using a template: Click the Condition and Output steps to view the predefined flow. You can adjust the steps to match your needs.
If starting from scratch: Click the Output to set the result of the flow. You can also click the icon to add another step to the function.
Note:
Fields with an alert icon  need your attention before you can activate the function.

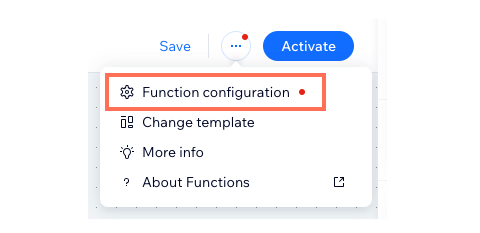
(Optional) Some templates require you to add additional configuration information. Click the More Actions icon
 at the top right and select Function configuration to edit.

Enter a name for your function at the top left. It's only visible to you and helps identify the function in the dashboard.
Click Activate at the top right to enable your function.
What's next?
Once activated, the function runs whenever customers at checkout meet the criteria.
Function examples
Click an example below to view step-by-step instructions of how to set up some popular functions.
Adding a fragile packing fee to an order
Charge customers a packaging fee when fragile items are added to the cart. Customers view this fee in the order subtotal.
To add a fragile packing fee:
Go to Functions in your site's dashboard.
Scroll down Additional Fees and click Create Function.
Select Fragile packing fee and click Use Template.
Click the Condition step to update the logic for your business. Click the default Item name property to change it to another identifier, like Item price or Item ID. You can also update the specific values the function checks (e.g., wine glasses).

(Optional) Click + Add Criterion to add another condition.
Click Apply to save the condition.
Click Output to choose the fragile packing fee that should be applied.Edit the amount and name of the fee.
(Optional) Enable the Collect tax toggle to make the additional fee taxable (calculated based on your tax settings).
(Optional) Click + Add Fee to add additional fragile packaging fees.
Select your site's main currency from the drop-down.
 Click Apply to save the output.
Edit the function name at the top left. This is only visible to you in the dashboard.
Click Activate at the top right.
Customers now receive an additional fee at checkout if they meet the function requirements.

Setting a minimum order subtotal
Apply a checkout rule that blocks customers from completing an order until they reach a certain subtotal. Customers receive a warning message showing how much more they need to spend to proceed with checkout.
To set a minimum order subtotal:
Go to Functions in your site's dashboard.
Scroll down Checkout validations and click Create Function.
Select Minimum order subtotal and click Use Template.
In the function builder, click the Condition step to update its logic or add criteria. By default, the condition checks if the cart amount is less than 100. Update the criteria to match your needs. You can also click +Add Criterion to add another condition.

Click Apply to save the condition.
Click Output to set the validation requirements.
Select the default validation to update it.
Click the Validation type drop-down to choose whether to display the message as a warning or an error:No, disable checkout and show error message: Customers cannot proceed with checkout until they meet the minimum order subtotal. They see a red error message.
Yes, enable checkout but show warning message: Customers can still place orders, but they see a yellow warning message at checkout.
Update the warning/error message text.
Important: If you changed the minimum order amount in the condition (e.g., decreased it from 100 to 50) make sure you also update the amount in the error message text.
(Optional) Click + Add Validation to create another requirement.
 Click Apply to save the output.
Edit the function name at the top left. This is only visible to you in the dashboard.
Click Activate at the top right.
Here is an example of what customers see at checkout if they do not meet the minimum order subtotal. The option to checkout is also disabled.

Creating a frequent buyer perk for loyalty program members
Allow members who made at least "X" orders in the last 30 days to convert their loyalty points into a discount.
To create a frequent buyer perk function:
Go to Functions in your site's dashboard.
Scroll down to Loyalty Rewards and click Create Function.
Select Frequent buyer perk and click Use Template.
In the function builder, click the Condition step to update its logic or add criteria. By default, the condition checks if orders in the last 30 day is greater than 2.

Click Apply to save the condition.
Click the Output step to set a points-to-discount conversion rate (how the reward is applied).Points: Set the number of points for the conversion rate (e.g., 20 points = $2 discount).
Discount value in site currency: Set how much the points are worth when converting them into a discount at checkout (e.g., 20 points = $2 discount).
 Click Apply to save the output.
Name the reward you're creating. Loyalty members will see this name on the main Loyalty page as well as the My Rewards page.Click the More Actions icon
 at the top right.
Select Function configuration.
Enter a reward name and description.
Click Save.
Edit the function name at the top left. This is only visible to you in the dashboard.
Click Activate at the top right.
Loyalty program members who meet the criteria can exchange loyalty points for a discount. They see this option at checkout.

FAQs
Learn more about Wix Functions and how to create customized flows for your business.
How can I use functions for my business?
Wix provides a wide range of business solutions designed to work with your site (e.g. Wix Stores, Wix Restaurants, Wix Loyalty program). However, every business is unique and has specific ways they like managing their processes.
With Functions, you can manipulate the Wix apps you use daily to better work with your unique needs–all without using code.
What are the different components that make up a function flow?
Every function is made up of the following parts:
Input: The input is the starting point of your function flow. It is a read-only step that represents the data you can expect to receive when the function runs (e.g., a customer's cart and checkout data).
Condition: Conditions allow you to create complex flows using 'if/else' logic. For example, set criteria for a fragile item added to the cart: 'IF a fragile item is added, then add a fragile packing fee; ELSE don’t add a fee.' Ensure your logic is correct, or the function won’t run properly. A condition can include up to 20 criteria.
Output: The output is the result you want to occur in existing Wix app flows. You set an output for every function you create. Each function type has a different output (e.g., the output for the Additional fees function type is the fee amount). The output is always the last step in the path.
Function configuration: Some function types have additional settings. For example, the Wix Loyalty Program custom rewards function requires you to add a reward name and description that's displayed for site visitors.
Actions: Actions allow you to perform additional tasks within the function flow. Use actions to streamline communication with your site visitors, deliver the right information at the right time, and optimize your business processes.
Note: Be careful with actions, as each one affects your function's performance, and a function can run multiple times during a site visit. For example, if you add a 'send an email' action without a defining condition, an email will be sent every time a customer updates their cart.
What is the difference between Wix Functions and Wix Automations?
Although Wix Functions and Wix Automations both allow you to create custom flows and logic for your business, they differ in how they affect any installed Wix apps on your site.
Wix Automations is designed to help you perform specific actions (e.g. send an email, create a task) in response to pre-defined triggers. Automations are useful when setting up repetitive, predefined tasks such as sending invoices for multiple customer orders. Automations operate independently, meaning they don't affect the way Wix apps work on your site.
Functions let you build custom logic within Wix apps. You can extend and modify the standard processes in the Wix app (e.g. Wix Stores) according to your unique needs. In a function, the Wix app waits for the function response before proceeding with the rest of the workflow. The function's output directly influences how the Wix app behaves.
What Wix apps can I build functions with?
Wix Functions works with these apps:
Wix Stores
Wix Bookings
Wix Restaurants Orders (New)
Wix Table Reservations
Wix Donations
Wix Forms
Wix Loyalty Program