Setting up your hotel
Wix Hotels by HotelRunner: Managing Your Site Languages
The Languages tab in the dashboard is where you can manage the translated text on your site. It allows you to add or remove languages, and edit the translations for each language.
Managing your site languages helps you cater to a broader audience, as visitors to your site can view it in their preferred language. Your guests' experiences are improved and the likelihood of future bookings is increased.
Important:
This article refers to the latest version of Wix Hotels by HotelRunner. We are in the process of releasing Wix Hotels by HotelRunner but it's not available to everyone yet. Sign up for more information about Wix Hotels by HotelRunner and join the beta.
For information on the previous version of Wix Hotels, click here.
Currently, you can only choose one language for your site. The ability to display your site in different languages is coming soon.
When you set a language other than English as the main language of your site, it's important to also include English US as a second language. This works as a backup in case translations are unclear or fail to generate.
In this article, learn more about:
Adding languages to your site
Add more languages to your site to cater to a wider audience and improve the user experience for visitors. This can increase the chances of bookings and revenue by making the site more accessible.
To add languages to your site:
Go to Languages in your site's dashboard.
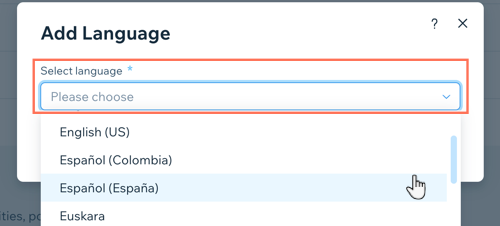
Click + Add Language.
Select the relevant language from the Select Language drop-down.
Click Add New Language.

Setting your main language
If you add different languages to your site, make sure to select the most popular language as your main site language.
To set your main language:
Go to Languages in your site's dashboard.
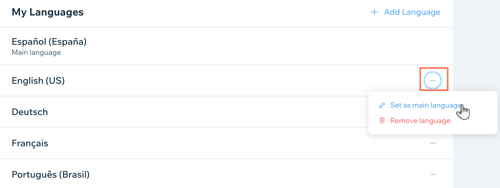
Click the More Actions icon
 next to the relevant language.
Click Set as main language.

Removing languages from your site
You can remove a language from your site if it is not generating enough traffic or bookings, or if you no longer accept bookings from certain markets.
To remove a language from your site:
Go to Languages in your site's dashboard.
Click the More Actions icon
 next to the language you want to remove.
Click Remove language, the click Yes to confirm.

Editing translated site text
You can edit the translated text that appears on your site, including on the Booking Engine element on your "Book a room" page. Properly translated text improves the overall visitor experience. It also increases the likelihood of receiving more bookings from different markets.
Important:
When editing your translated text, make sure not to delete or edit any code text, for example: "{store_name}" or "%{count}". These codes draw information from your site so that the translated text appears in the right location on elements like your Booking Engine.
To edit the site text in a language:
Go to Languages in your site's dashboard.
Scroll down to the Translate your content section.
Select the language in which you want to edit your site text from the drop-down on the right.

Choose what text content you want to translate:
Room Types
You can edit the translations for each room type you offer, including the room name and the amenities.
To edit the translated text for your room types:
Click Translate next to Room Types.
Hover over the relevant room type and click Translate.
Select the relevant language from the Translate into drop-down at the top right.
Click to edit any of the translated text.
Click Save.
Repeat the steps above for all room types.

Email Templates
Edit the translations for the Email Templates you send, including the Reservation information, New reservation, Reservation confirmation, cancelation and update emails.
Note: When editing your translated text, make sure not to delete or edit any code text, for example: "{store_name}" or "%{count}". These codes draw information from your site so that the translated text appears in the right location on elements like your Booking Engine.
To edit the translated text for your Email Templates:
Click Translate next to Email Templates.
Hover over the relevant email template and click Translate.
Select the relevant language from the Translate into drop-down at the top right.
Click to edit the text of the relevant fields.
Click Save at the top.
Repeat the steps above to edit the translations of any other email templates.

Tax Categories
Edit the translations for the Tax Categories you list on your site.
To edit the translated text for your Tax Categories:
Click Translate next to Tax Categories.
Hover over the relevant tax category and click Translate.
Select the relevant language from the Translate into drop-down at the top right.
Click to edit the translations in the relevant field(s).
Click Save at the top.

Extras
You can edit the translated text for any Extras you offer which increases the likelihood of guests purchasing them.
To edit the translated text for your Extras:
Click Translate next to Extras.
Hover over the relevant Extra and click Translate.
Select the relevant language from the Translate into drop-down at the top right.
Click to edit the translations in the relevant field(s).
Click Save at the top.
Repeat the steps above for each of your Extras.

Property Settings - Policies
Edit the translated text of your policies to prevent guests from misunderstanding your terms when they book. This can help you avoid potential negative feedback and disputes.
To edit the translated text of your policies:
Click to expand Property Settings.
Hover over Policies and click Translate.
Hover over the relevant policy and click Translate.
Select the relevant language from the Translate into drop-down at the top right.
Click to edit the translations in the relevant field(s).
Click Save at the top.
Repeat the steps above for each of your policies.

Property Settings - Room Amenities
Translating your room amenities into other languages makes it easier for guests to make informed decisions about their bookings.
To edit the translated text of your Room Amenities:
Click to expand Property Settings.
Hover over Room Amenities and click Translate.
Select the relevant language from the Translate into drop-down at the top right.
Click to edit the translations in the relevant field(s).
Click Save at the top.

Property Settings - Booking Engine
Make it easier for your guests to book by translating the text that appears on your Booking Engine. The Booking Engine is where guests input the details of their stay before booking, so it's important to make the information as clear as possible.
This section is where you can update the keywords in the Booking Engine, such as "room", "guest", "suite" etc. You can also update the translated text of elements such as your banners explaining that availability is running low.
To edit the translated text on your Booking Engine:
Click to expand Property Settings.
Hover over Booking Engine and click Translate.
Select the relevant language from the Translate into drop-down at the top right.
Click to edit the translations in the relevant field(s).
Click Save at the top.
