Taking online orders (NEW)
Wix Restaurants: Managing Notifications for Online Orders
Notifications are essential for every restaurant, providing customers with timely updates about their orders. You can use our pre-installed notifications or create your own.
As a restaurant owner, you can control the notifications sent to customers and the ones you receive to stay on top of order details. Send real-time updates via email and SMS, including tracking links, to keep customers in the loop.
In this article, learn more about:
Notification preferences
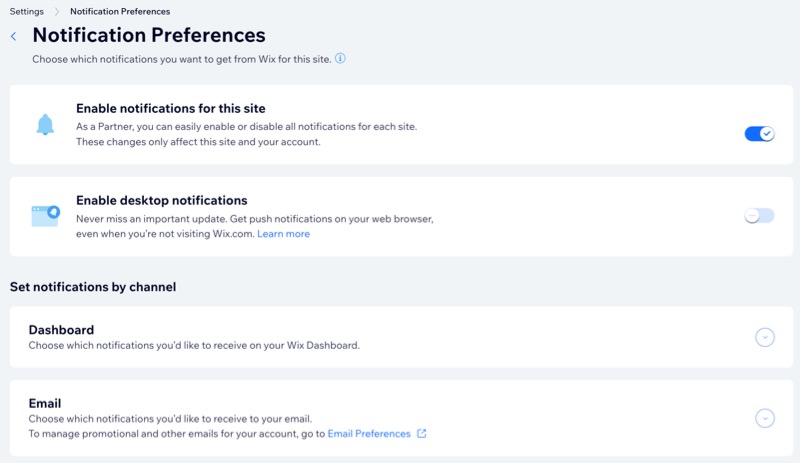
You can manage all your site notifications in one place, choosing which updates to receive from both your dashboard and the Wix app. This includes important order notifications, such as when a new order is submitted.
Customize your notification preferences for email and desktop. You can also opt for sound alerts and push notifications using the Wix app.
Notes:
All notifications are turned on automatically, but you can toggle off the ones you don't need.
Notification preferences affect only your site and account, not site collaborators.
To set up your notification preferences:
Dashboard
Wix app
Go to Restaurant Orders Settings in your site's dashboard.
Click Notification preferences under Notifications.
(If disabled) Click the Enable notifications for this site toggle to receive notifications for your site.
Set your notifications by channel:
Desktop
Click the Enable desktop notifications toggle to enable or disable push notifications on your browser.

Dashboard
Click Dashboard and enable the notifications you want to receive in your Wix dashboard.
Note: By default, "New order was submitted" is enabled under Wix Restaurants Orders (New).

Click Email and enable the notifications you want to receive to your email. By default, "New order was submitted" is enabled under Wix Restaurants Orders (New).
Notes:
Email notifications are sent to your Wix account email address and not the business email set in your business info.
If you'd like others to also receive these notifications, you can invite them to manage your restaurant.


Managing outgoing notifications
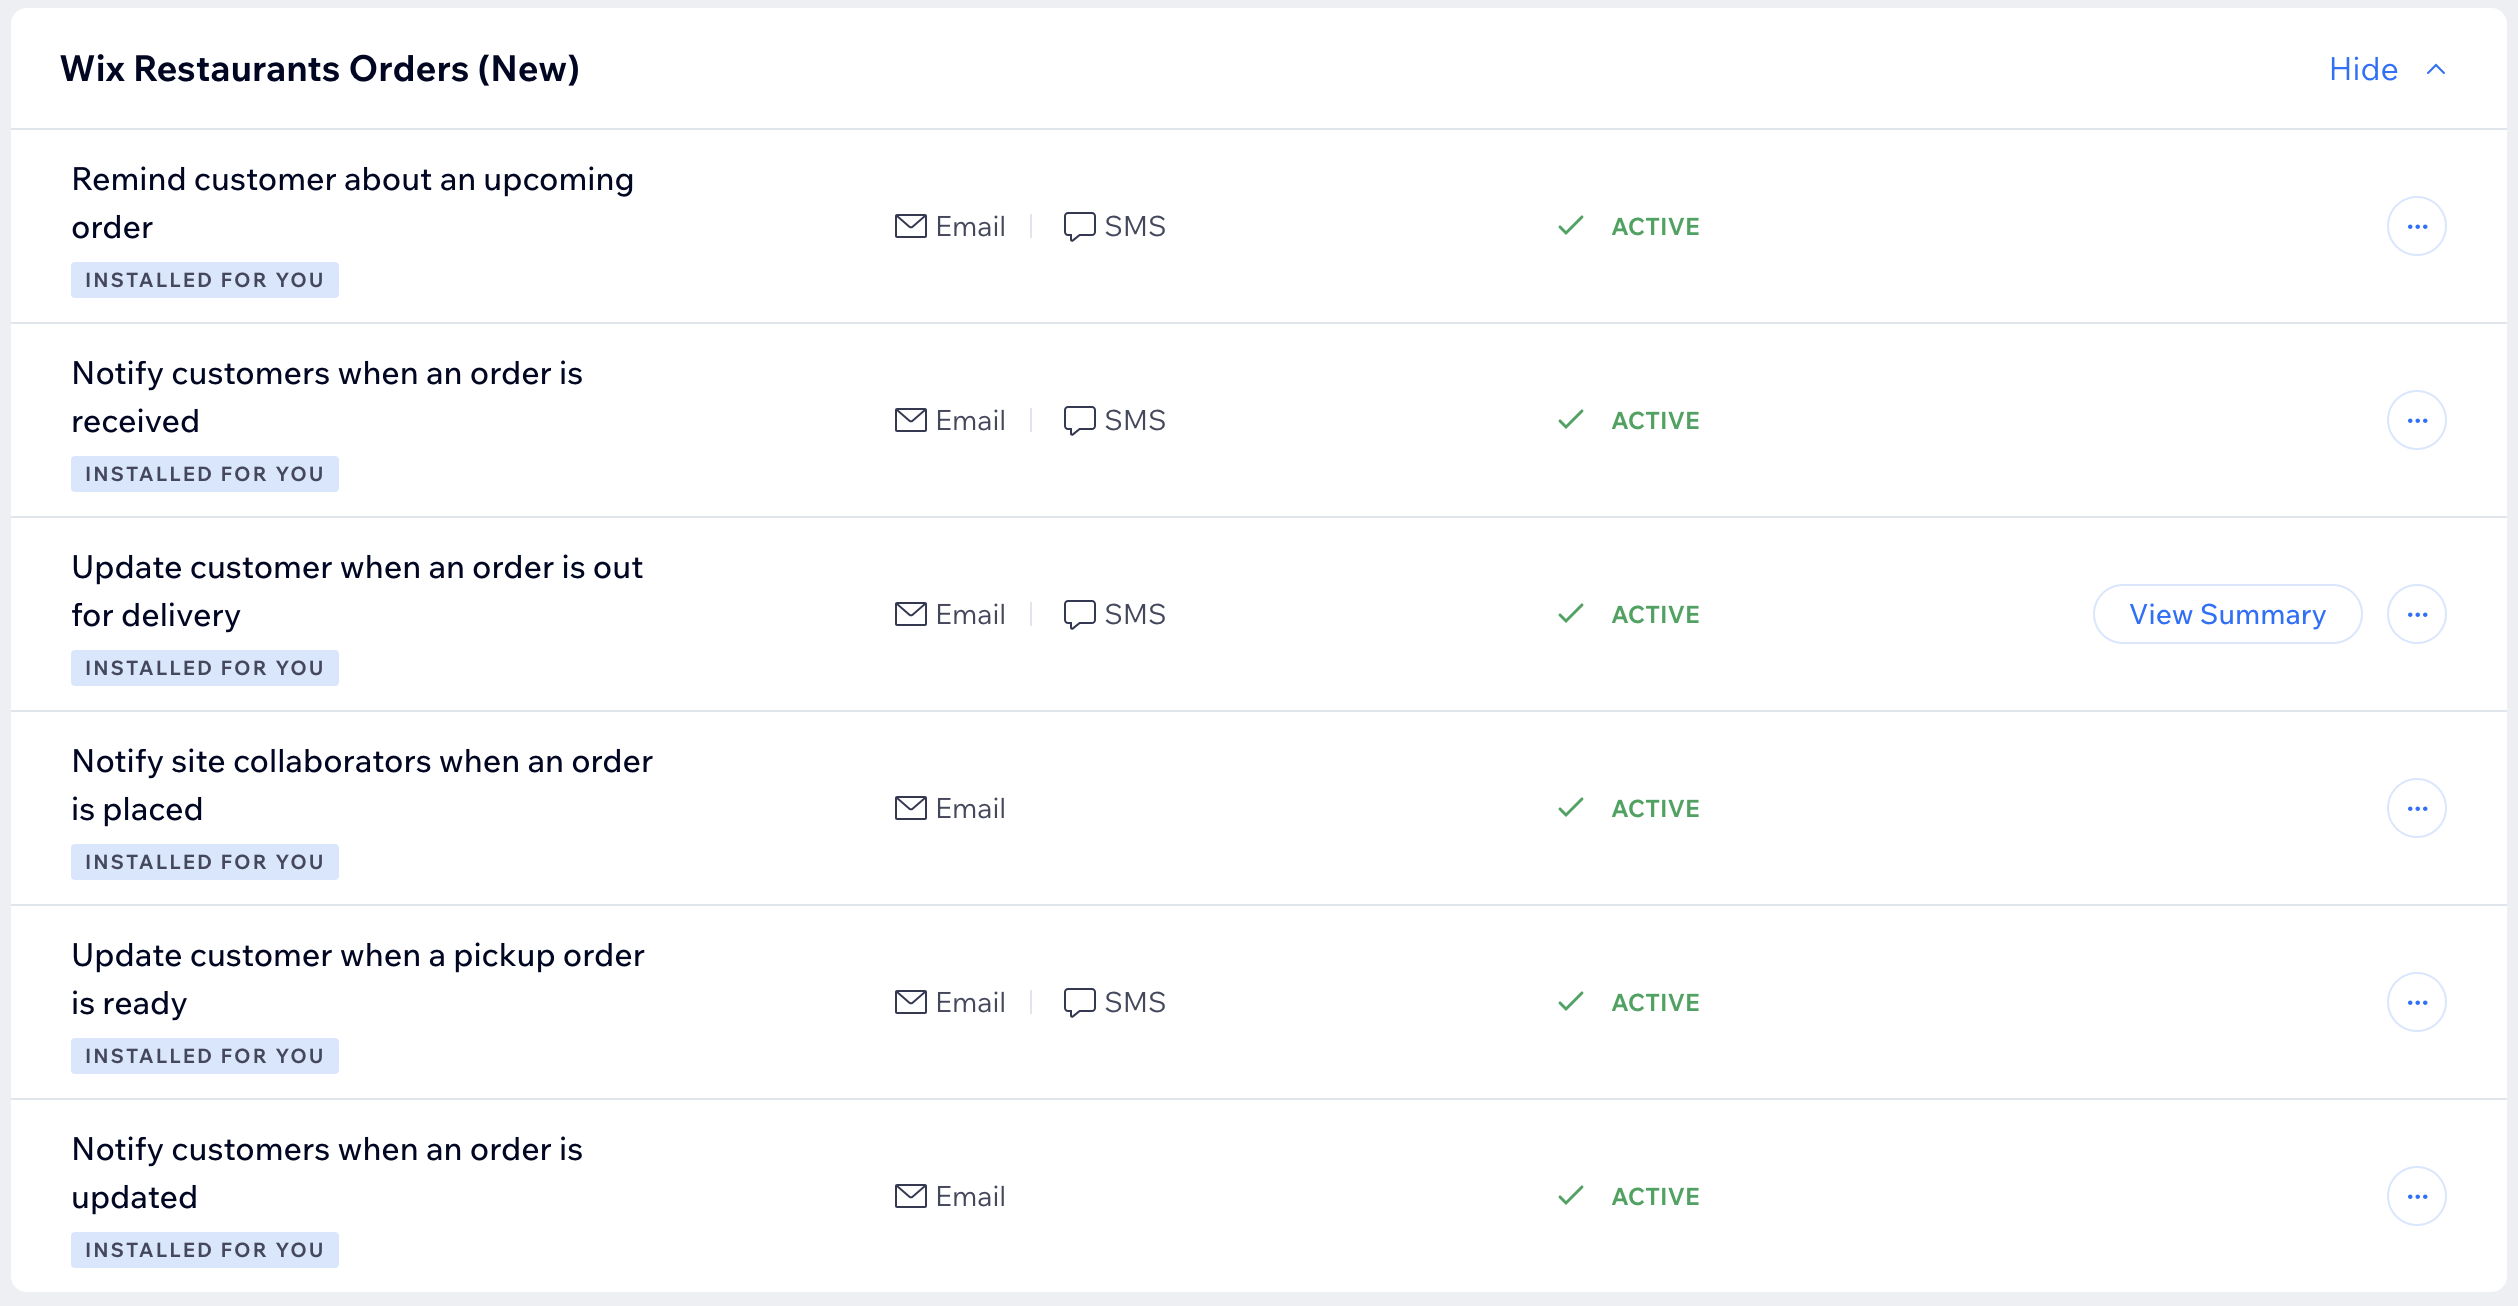
Wix Restaurants Orders (New) includes pre-installed outgoing notifications to update customers about their orders and keep site collaborators (e.g. kitchen staff) in the loop. You can manage, edit, and duplicate these notifications, including custom ones you create.
Pre-installed notifications for your customers
Notify customers when an order is received: Send an email / SMS confirmation to customers when their order is placed.
Remind customer about an upcoming order: Notify customers via email or SMS about their upcoming orders.
Update customer when a pickup order is ready: Send an email or SMS to let customers know their order is ready for pickup.
Update customer when an order is out for delivery: Send an update via email or SMS when their order is on its way.
Update customer when an order is created for them Notify customers via email or SMS when an order is created for them.
Notify customers when an order is updated: Update customers when there are changes to their order.
Pre-installed notifications for site collaborators (e.g. staff members)
Notify site collaborators when an order is placed: Alert site collaborators when a new order is received.
Important: To notify a staff member, first assign them a site collaborator role in your dashboard. Then, include their role when adding recipients in the relevant automation email.
Tip:
The notifications you receive are managed using Wix Automations.
To manage outgoing notifications:
Go to Restaurant Orders Settings in your site's dashboard.
Click Order Updates and Outgoing notifications under Notifications.
Choose how to manage your notifications under Wix Restaurants Orders (New):
Edit
Click the More Actions icon
 next to the relevant notification.
Click Edit.
Update the necessary details.
Click Save.
Note: Currently, you can edit email notifications, but SMS messages cannot be edited.
Duplicate
Click the More Actions icon
 next to the relevant notification.
Click Duplicate.
Edit the relevant details and update your duplicated automation's name, or it will remain 'Copy of...'.
Click Activate.
Note: Currently, you can duplicate email notifications, but SMS messages cannot be duplicated.
Rename
Click the More Actions icon
 next to the relevant notification.
Click Rename.
Update the automation's name.
Click Save.
Note: It is not possible to rename "Installed for you" automations.
Delete
If you want to use an automation at a later time, consider deactivating it instead of deleting it.
Click Delete.
Click Delete to confirm.
Note: It is not possible to delete "Installed for you" automations, but you can deactivate them.

Tip:
You can also customize the email notifications that you send out.
Receiving sound alerts for new restaurant orders
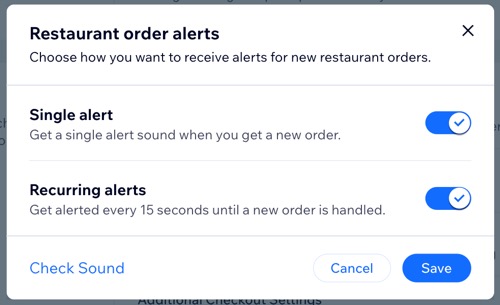
Customize how you receive notifications for new restaurant orders. Opt for a single alert sound for each new order or choose to receive repeated alerts every 15 seconds until the order is acknowledged.
To receive a sound notification:
Go to Restaurant Orders Settings in your site's dashboard.
Click Reminder sounds.
Click the alert toggle to set your notification preference:Single alert: Receive one sound for each new order.
Recurring alerts: Get notified every 15 seconds until the order is handled.
Click Save.

Tip:
Click Check Sound to preview the alert tone for new orders.
Creating new notifications
Create additional notifications to automate your online orders efficiently. Each automation starts with a trigger, such as sending an email when an order is ready for pickup, and can include multiple actions to suit your requirements.
For example, when a customer places an order, you can send a confirmation email, update the kitchen staff, and notify the customer when the order is out for delivery.
Tip:
Make sure to assign your site collaborators a role (e.g. kitchen staff) in your dashboard. Then, include their role when adding recipients in the relevant automation email.
To create a notification:
Go to Automations in your site's dashboard.
Click + New Automation or click an existing automation to edit it.
Click + Start from Scratch.
Click the title to give your automation a name.
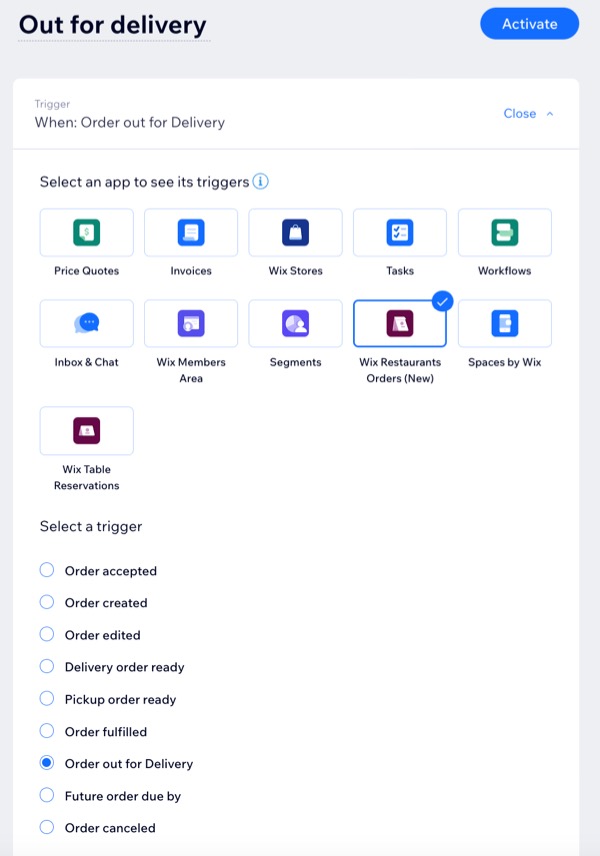
Click the Wix Restaurant Orders (New) app in the Trigger section.
Select the checkbox under Select a trigger to choose a trigger for your notification.
Click the Limit Frequency dropdown and choose how often the same contact can trigger this automation (e.g. Don't limit, Once per contact, Once per 24 hours).
(Optional) Set the delay after the trigger and add a condition to specify the automation:
Add a delay
You can set the delay between a trigger and its action. For example, if your trigger is 'Order placed,' you may want the action, like sending a confirmation email, to happen immediately.
Click + Add Delay.
Click the drop-down and select when to perform the action (e.g. days, hours and minutes).
Note: If you don't add a delay, the action is performed as soon as the trigger occurs.
Add a condition
After choosing a trigger, add a condition to make the automation more specific. For example, if you offer multiple menu items, you can set a condition so the automation only applies to specific dishes.
Click + Add Condition.
Click the Continue the automation if drop-down and select the criteria you want to use to decide whether this automation continues each time it's triggered.
Click the drop-down that appears next to your criteria drop-down to select your operator (e.g. "is", "is not").
Click the drop-down or text box that appears next to the operator drop-down to complete your condition.
Note: The logical statement you've created will determine whether the automation continues.(Optional) Click + Add Criteria to add more conditions.
9. Choose an action using the available options.
Tip: Click + Add an Action to set up a multistep automation.
10. Click Activate to save and activate the automation.

FAQs
Click on a question to learn more about notifications for online orders.
How can I make sure my site collaborators receive the relevant notifications?
The Wix Restaurants Orders (New) app includes a pre-installed notification for informing site collaborators when an order is placed.
First, you must assign them a role, such as kitchen staff, then add them as a recipient to receive these notifications.
Do "Installed for you" automations count towards my monthly email limit?
No, "Installed for you" automations are not deducted from your monthly email balance.
You can monitor your quotas on your Automations page to keep track of usage and know when it's time to upgrade. Certain automation actions, like "Send an email," count toward your site's email marketing plan quotas.
Which pre-installed SMS automations are included in my quota?
When an order is received, out for delivery, or ready for pickup, notifications are sent to keep customers informed.

You can check your SMS quota to see how many messages you've sent this month and how many are still available.
Where can I see all of my site's automations?
Go to Automations in your site's dashboard.
Scroll down to the Your automations section to view all of your automations:Created by you: Active and inactive automations you've created here or directly through an app.
Installed for you: Active and inactive automations created automatically when you've installed apps.
(Optional) Hover over an automation to View Summary, including the last trigger date and the total times triggered.
Tip: Click Filters to view only active or inactive automations, or those with specific triggers or actions.

Can I deactivate an automation instead of deleting?
Yes. Deactivating an automation will stop it running without deleting it. You can reactivate at any time. Click the Active toggle to deactivate an active automation.

Note:
Trigger data isn’t collected when an automation is inactive, and it won’t run retroactively when reactivated.
For example, if an order confirmation email automation is deactivated on Monday, and a customer places an order on Tuesday, reactivating the automation on Wednesday won’t send the confirmation email for that order.