Managing products and categories
Wix Stores: Editing Multiple Products at the Same Time
Save time by updating multiple products at once instead of editing them one by one. Bulk edits can be done in a number of different ways. Select the method that works best for you.
In this article, learn how to:
Making bulk updates to products from your site's dashboard
Save time by making a wide variety of changes right in the Store Products tab in your site's dashboard. You can change the base price, set a sale price, add the same info section and much more.

To make bulk changes in your site's dashboard:
Go to Store Products in your site's dashboard.
Select the products you want to change:All products: Select the checkbox at the top left.
Individual products: Select the checkboxes next to the relevant products.
Category: Click Filter and select 1 or more categories.
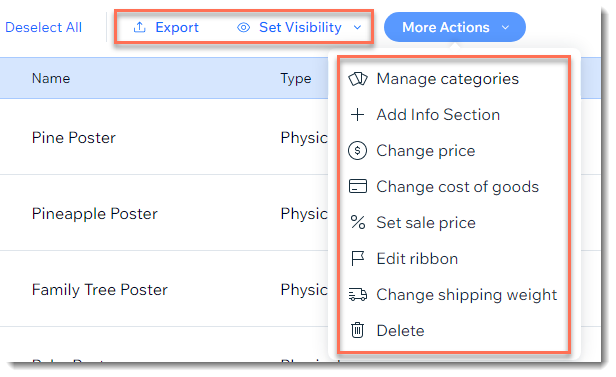
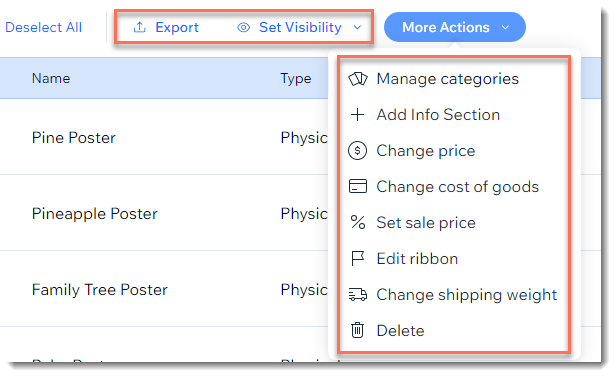
Select the change you want to make:
Export product data
Click Export to download product data for the products you selected. The information is downloaded to a CSV file.

Notes:
Exporting data about digital products is not currently supported. You can vote for this option.
Learn more about exporting product lists.
Set visibility
Set your products to be visible or hidden in your online store.

Learn more about changing product visibility.
Add a info sections
You can add the same info section to multiple products.
Click More Actions and select + Add Info Section to get started and then follow the regular instructions on how to create an info section.

Note: Currently, it's not possible to remove an info section from multiple products at once.
Change product prices
You can change the base price of products in a number of ways:
Increase by amount: E.g. add $10 to the current price.
Reduce by amount: E.g. lower the current price by $10.
Set a new price: E.g. set the price to $50.
Increase by percentage: E.g. increase the current price by 20%.
Decrease by percentage: E.g. reduce the current price by 20%.
To change the base price of products:
Click More Actions.

Select Change Price.
Select an option from the What change would you like to make? drop-down.
Enter the amount, price, or percentage.
Click Change Prices.
Note: When you change the base price of a product, other prices change accordingly. For example, if a product has a sale price of $10 off the regular (base) price, the $10 will come off the new price. Learn how changing the base price affects product variant with different prices and subscriptions.
Change the cost of goods
You can add a cost of goods amount to multiple products at once, or change the existing cost of goods.
You can change the cost of goods for the products you selected in a number of ways:
Increase by amount: E.g. Increase the current cost of goods by $10.
Reduce by amount: E.g. lower the current cost of goods by $10.
Set a new cost of goods: Enter the relevant cost of goods.
Increase by percentage: E.g. Increase the current cost of goods by 20%.
Decrease by percentage: E.g. Reduce the current cost of goods by 20%.
To change the current cost of goods:
Click More Actions.

Select Change cost of goods.
Select an option from the What change would you like to make? drop-down.
Enter the amount, price, or percentage.
Click Save.
Note: If a product has variants with different cost-of-goods amounts, they all change accordingly. For example, if the cost of goods for the small variant is $10 and for the large variant is $20, and you increase the cost of goods by $2, the new cost of goods will be $12 for small variant and $22 for large.
Set sale prices
Create a store sale by reducing the price of multiple items by a set percentage. When you do, customers see the original price crossed out next to the sale price.

To set sale prices:
Click More Actions.

Select Set sale price.
Enter the discount percentage and click Apply.
Tip: When the sale is over, you can remove the sale price by following the same steps and entering 0% as the discount percentage.
Change shipping weights
You can add the same weight to multiple products at once.
Note: If the products you selected or their variants already have weights, the new weight you enter will override it.
To change shipping weights:
Click More Actions.

Select Change shipping weight.
Enter a weight and click Save.
Tip: To enter a value that is less than a pound or kilo, enter a zero before the decimal point (e.g. 0.5).
Learn more about adding product weights.
Manage product categories
You can add (or remove) the products you selected from any category. Additionally, you can create a new category. When you do, the products you selected are automatically added to it.
To manage product categories:
Click More Actions.

Select Manage categories.
Select what you want to do:Add products: Select the checkbox next to the relevant category or categories.
Remove products: Deselect the checkbox next to the relevant category or categories.
Create a category: Click Create category and enter a category name.
Click Apply.
Manage ribbons
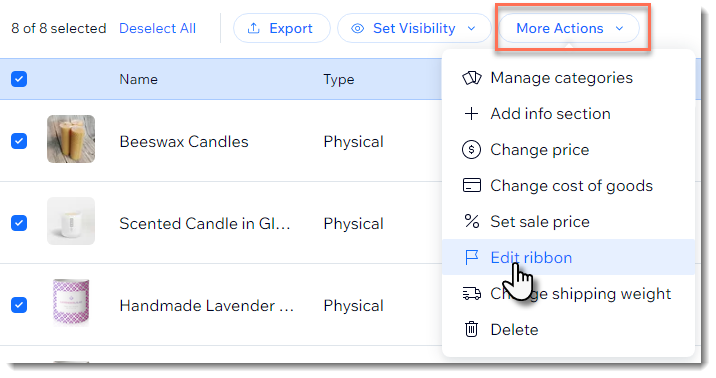
You can add the same ribbon to multiple products or edit the text of an existing ribbon. You can also remove a ribbon from products.
Note: If the products you selected already have a ribbon, a new ribbon will replace it.
Click More Actions and select Edit ribbon to get started. Learn more about how to make changes to ribbons.

Delete products
You can delete multiple products from your store, but it's important to know you won't be able to recover them.
Notes:
You can delete up to 999 products at a time.
Instead of deleting products permanently, you can hide them from your live store. See Set visibility above.
To delete products:
Click More Actions.

Select Delete.
Click Delete to confirm.
Note: This action cannot be undone.
Making bulk updates to products using a spreadsheet
You can make edits to multiple products by exporting (downloading) your products to a CSV file. After making your changes and saving them, import the file back to your store.
Notes:
Exporting digital products is not currently supported.
You can export up to 5,000 products.
To make bulk updates using a spreadsheet:
Go to Store Products in your site's dashboard.
Click More Actions at the top right.
Select Import.
Click Download CSV File.

Click Wix CSV with your products.
Open the CSV file.
Note: Mac users should open the file with Numbers or Excel version 15 or higher.Save the downloaded file in CSV (Comma delimited) format.
Update the product info and save file with a different name.
Important:
Certain changes (e.g. deleting or adding columns) will break the file. To learn what each of the columns is and how to edit the file safely, click here.
Go back to Store Products in your site's dashboard.
Click More Actions at the top right.
Select Import.
Click Upload CSV File.

Upload the updated file you saved in step 7.
If there are error messages, correct them and import the file again.